
Create ServiceNow Development Instance for testing
- Login to ServiceNow.You can create a new account if you don’t have one yet.
- ServiceNow provides a developer instance (for free) that can be used for NSB integration tests. This document uses a developer instance for this purpose. The steps will be the same in creating a production ServiceNow instance.
- To create a developer instance, go to https://developer.servicenow.com/dev.do
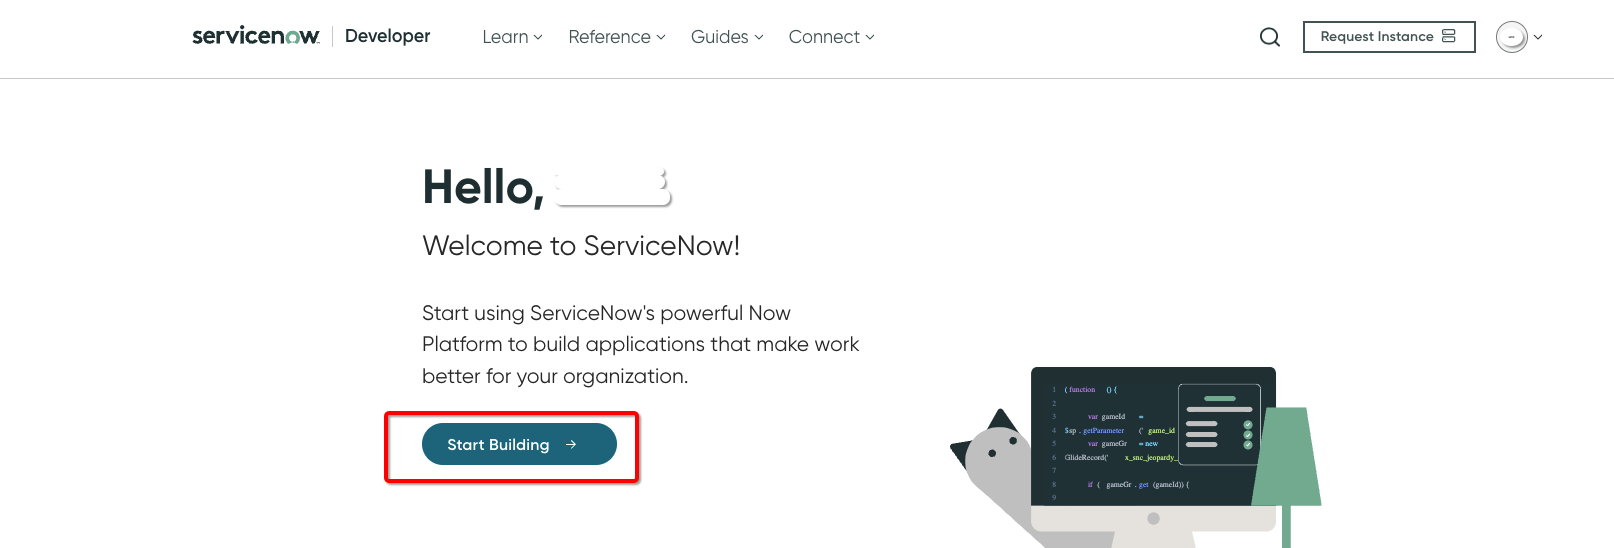
Create a developer account, then log in to build a developer ServiceNow.
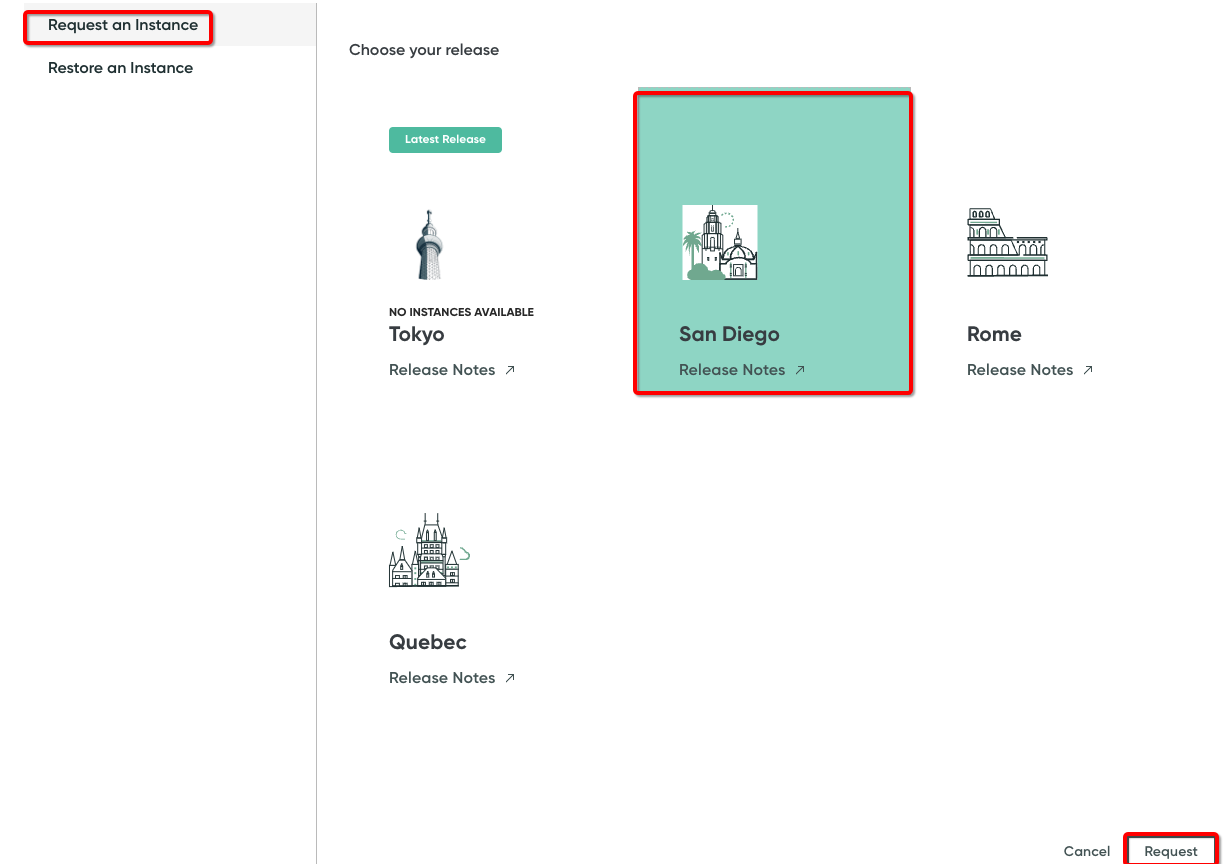
To create a developer instance, click on Start Building, then Request an Instance.
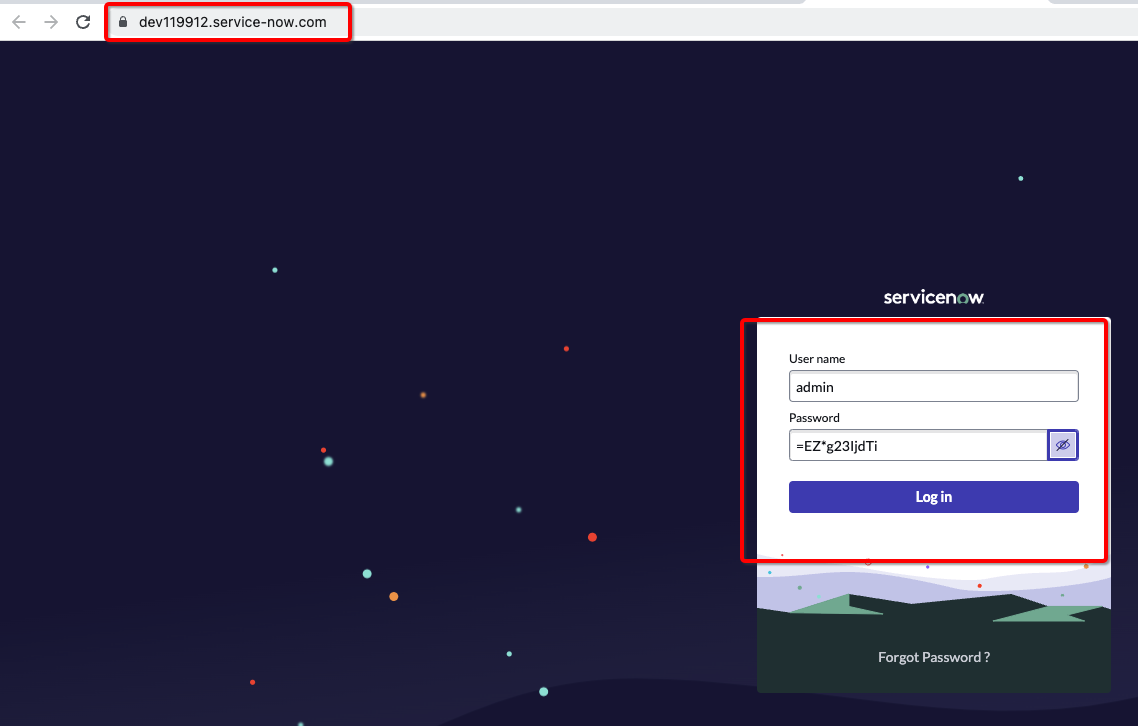
After building the developer instance, you will be provided an instance URL, login user name, and password. (In our example, the developer instance URL is https://dev119912.service-now.com and the username/password is “admin/=EZ*g23IjdTi”)
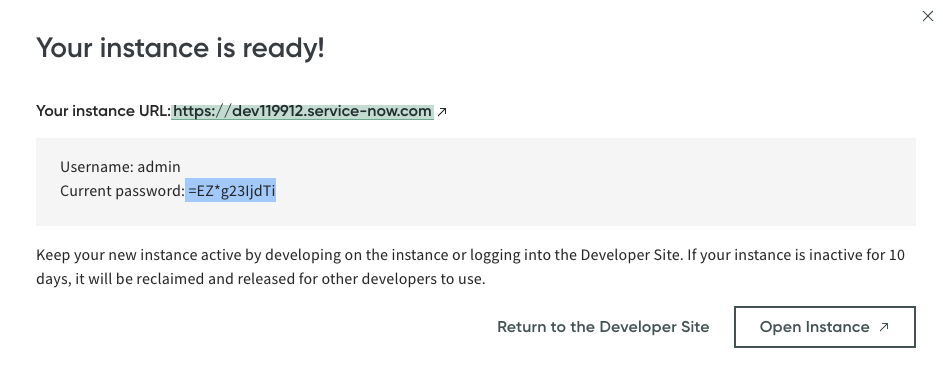
Important Note: If you do not access the developer instance for a few days, the instance state will be changed to hibernate. After some additional time, the instance will be deleted.
- Login to the new instance using your admin account
Create ServiceNow New Field for Nile Service
- ServiceNow provides default fields for Incidents, and this can be extendable. We will need to add a new field, “External Id” as an example to the Incident table. This field will be used to correlate Nile alerts to ServiceNow Incidents.
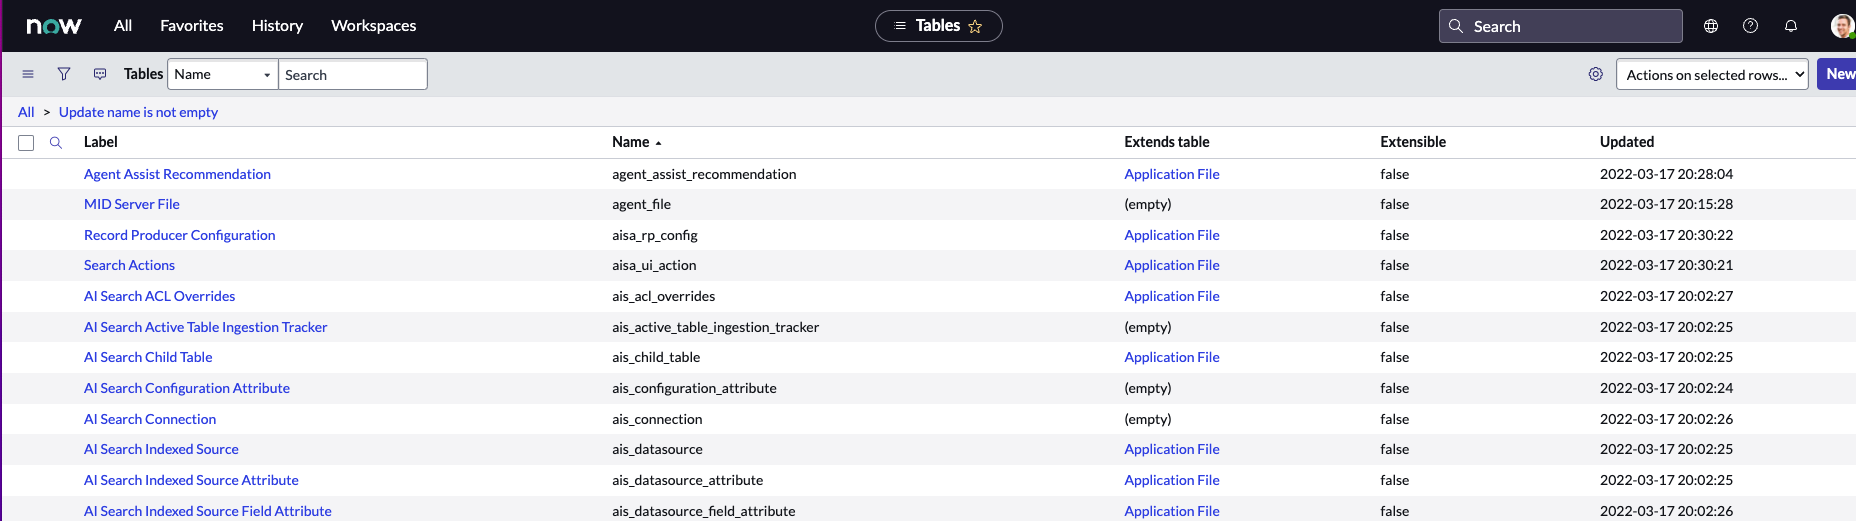
- From the All tab, click the down-caret to expand System Definition; under System Definition, select Tables

- The list of tables (model) in the ServiceNow is shown below:
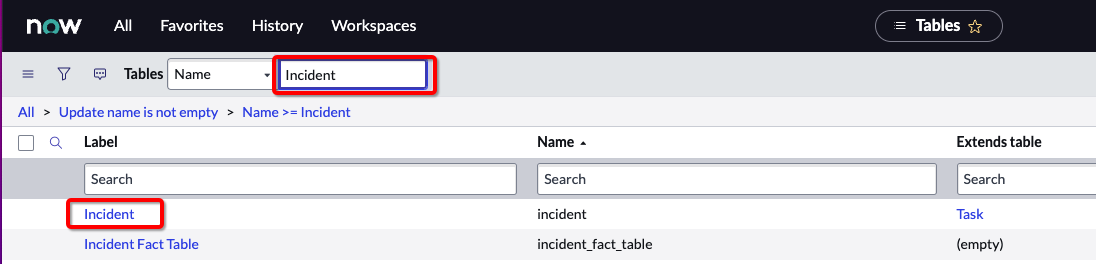
- Search for Incident table by keying “incident” in the Search field. From the search results, click on the link “Incident”.
- In the “Columns” tab, add the label “Incident”, the name “Incident”, then then click New to update the table schema/model with the Nile incident column.

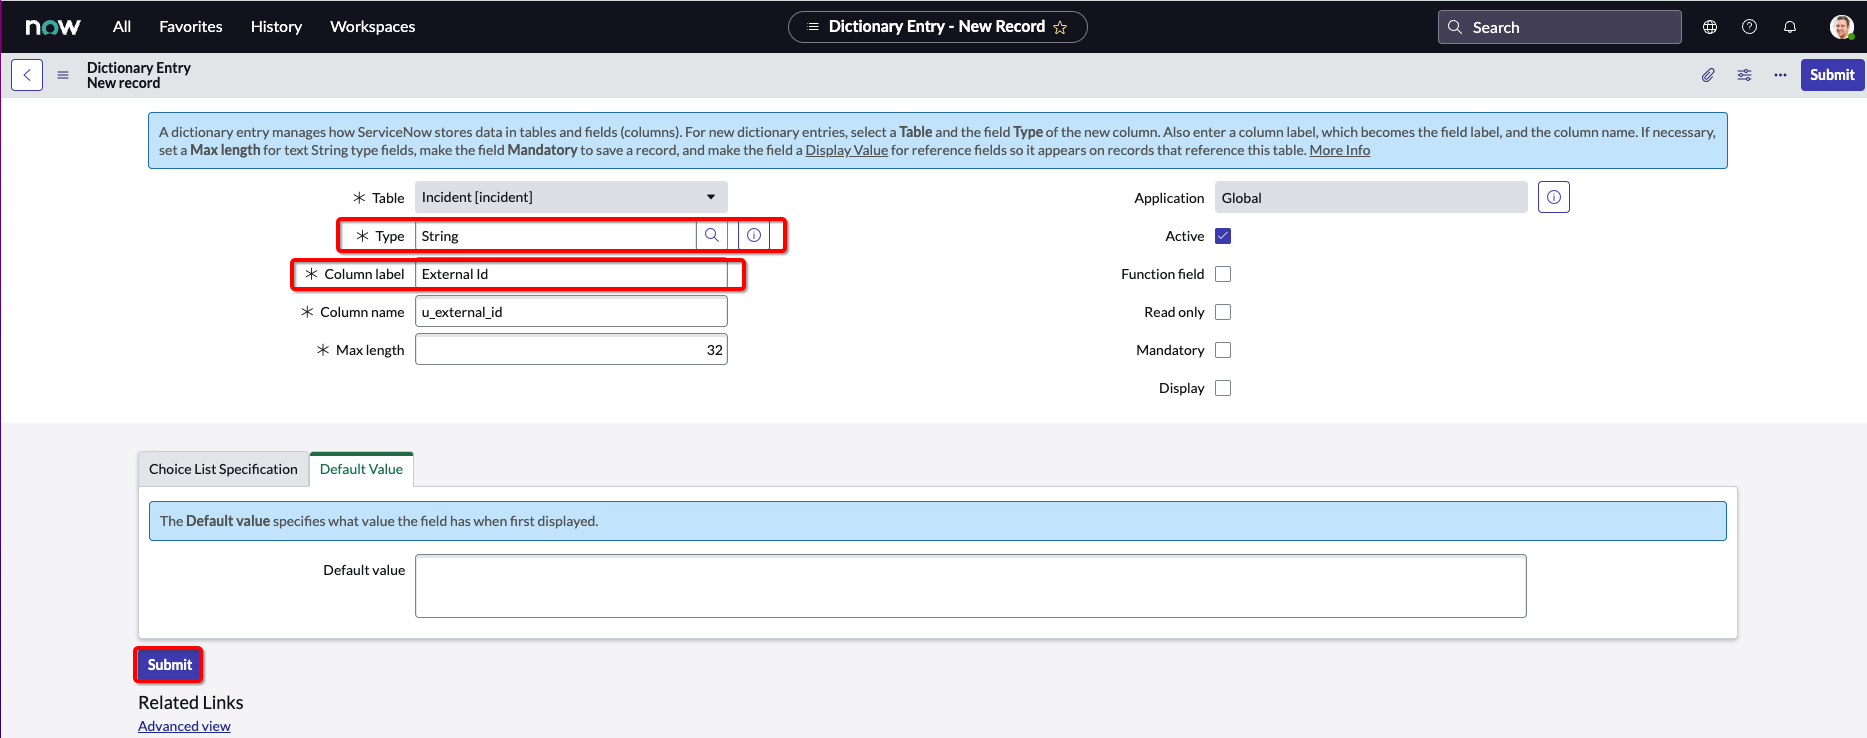
- From the column option, set Type as “String”, make the Column Label as “External Id” and the column name will auto generated “u_external_id”. we will use the column name for the integration with Nile webhooks. In this example, the column_name is “u_external_id” . Specify the max length as 32 and click “Submit
Create ServiceNow New Field for Nile Service
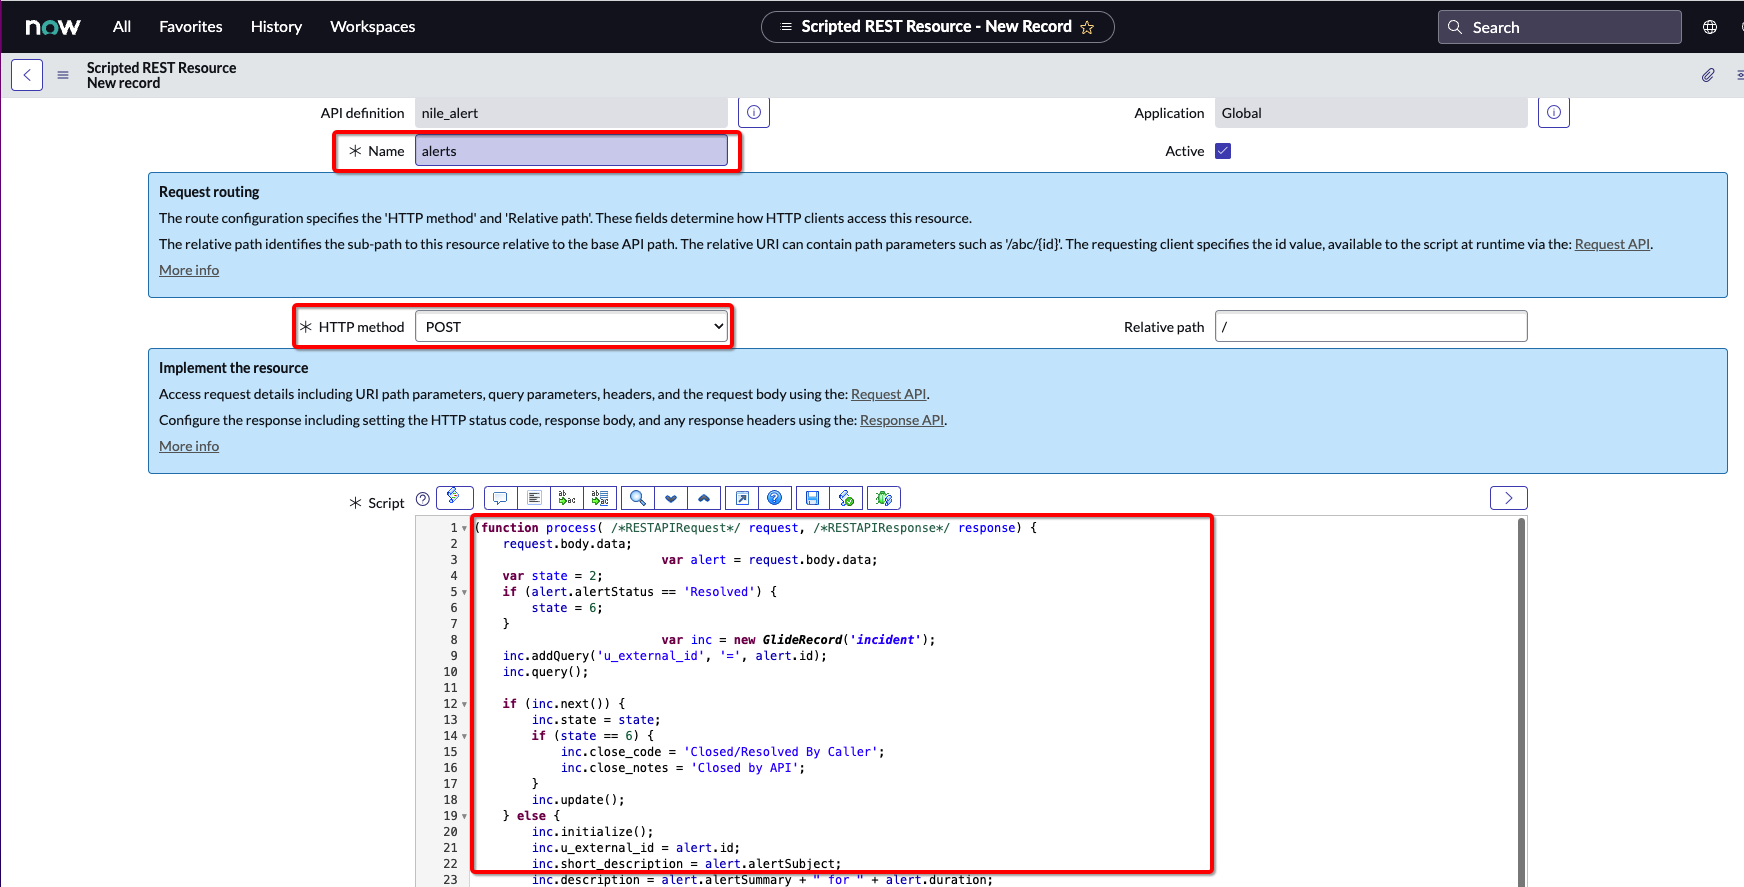
- The next step is to create a Java scripted Rest APIs which handles the Webhooks requests from Nile notification-services. Below is the Java script that we will use to create the API:
(function process( /*RESTAPIRequest*/ request, /*RESTAPIResponse*/ response) {
request.body.data;
var alert = request.body.data;
var state = 2;
if (alert.alertStatus == 'Resolved') {
state = 6;
}
var inc = new GlideRecord('incident');
inc.addQuery('u_external_id', '=', alert.id);
inc.query();

if (inc.next()) {
inc.state = state;
if (state == 6) {
inc.close_code = 'Closed/Resolved By Caller';
inc.close_notes = 'Closed by API';
}
inc.update();
} else {
inc.initialize();
inc.u_external_id = alert.id;
inc.short_description = alert.alertSubject;
inc.description = alert.alertSummary + " for " + alert.duration;
inc.insert();
}
response.setStatus(200);
})(request, response);
Note: you can customize the script.
For more information on ServiceNow API scripts use the following URL:
https://docs.servicenow.com/bundle/rome-application-development/page/integrate/custom-web-services/reference/r_ScriptedRESTServiceScriptExamples.html
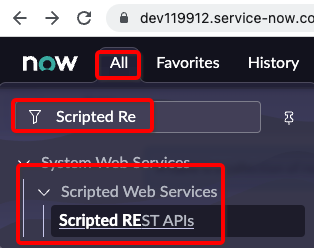
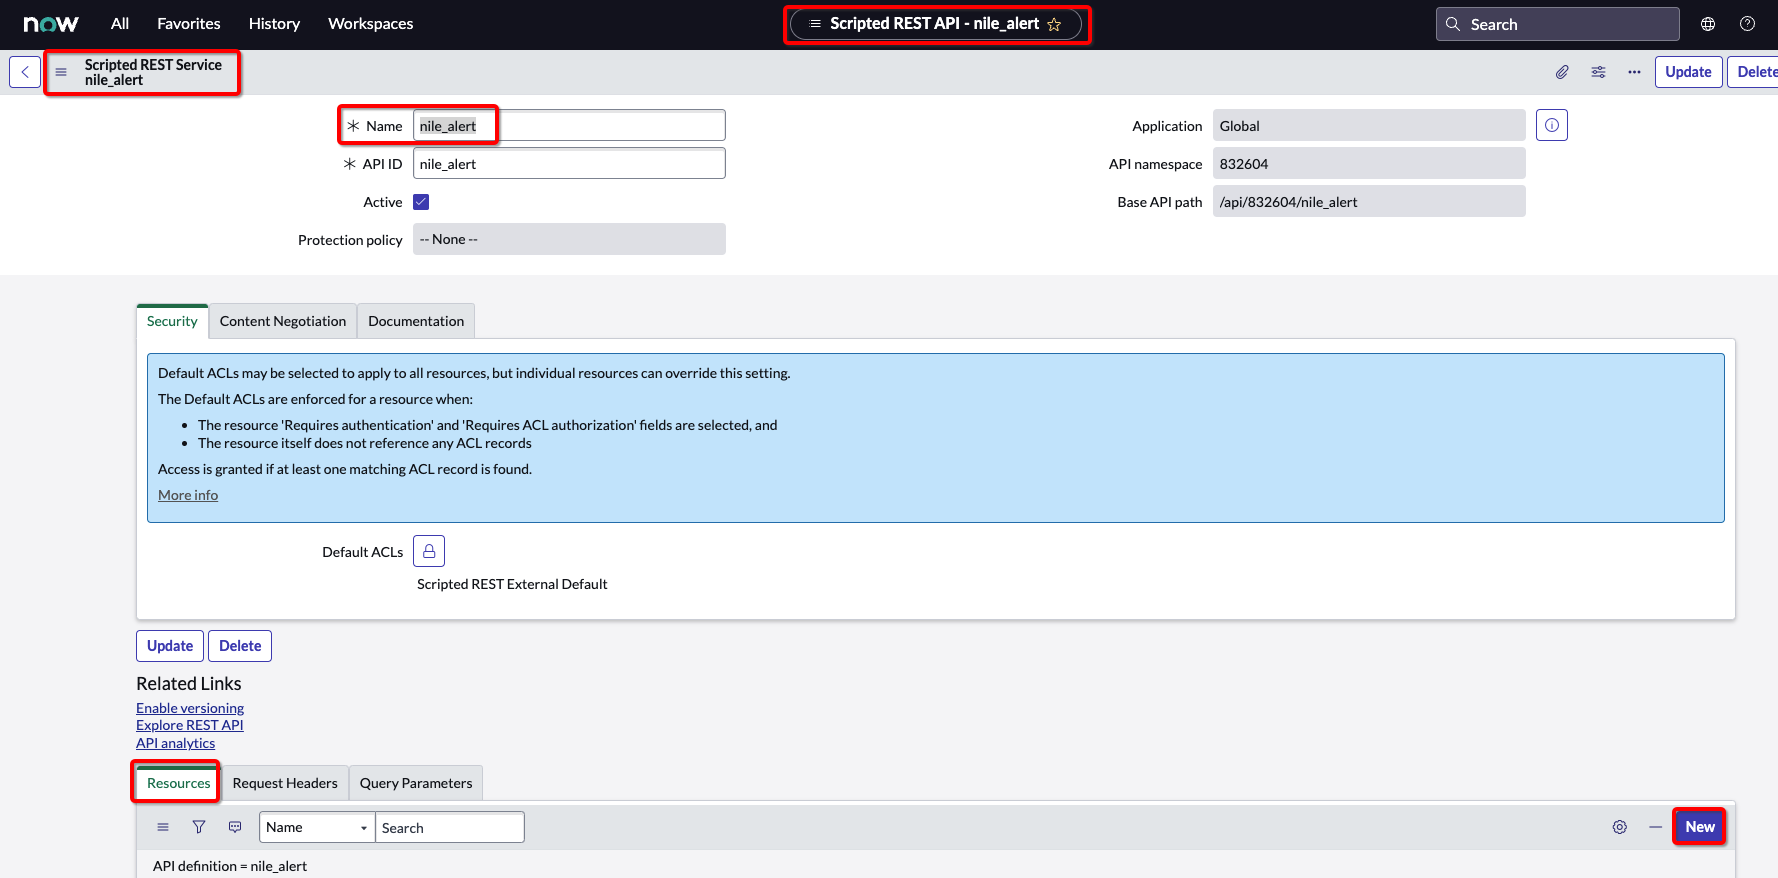
- To add the script API to ServiceNow, navigate to All and filter on “Scripted Rest APIs” and click the link. Script REST APs link will show the list of existing REST APIs. Click on New to create a new API for Nile Webhooks.
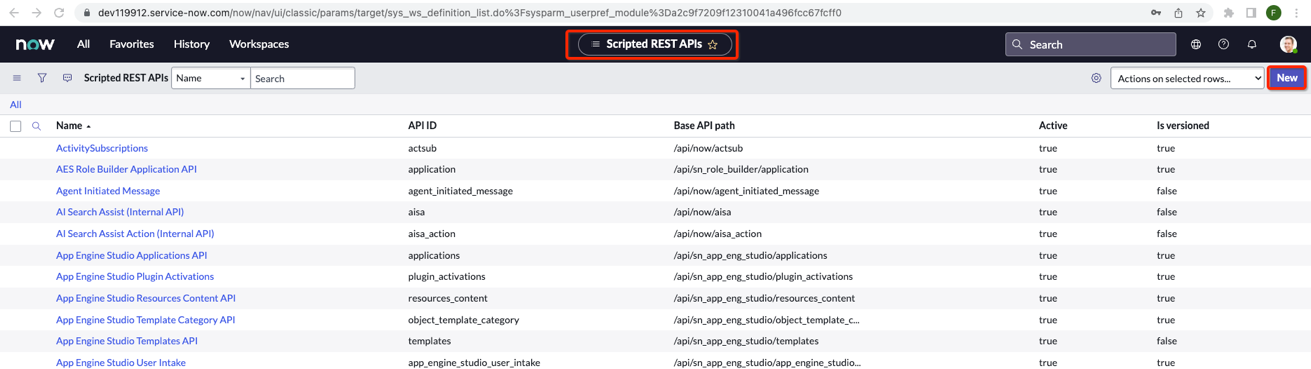
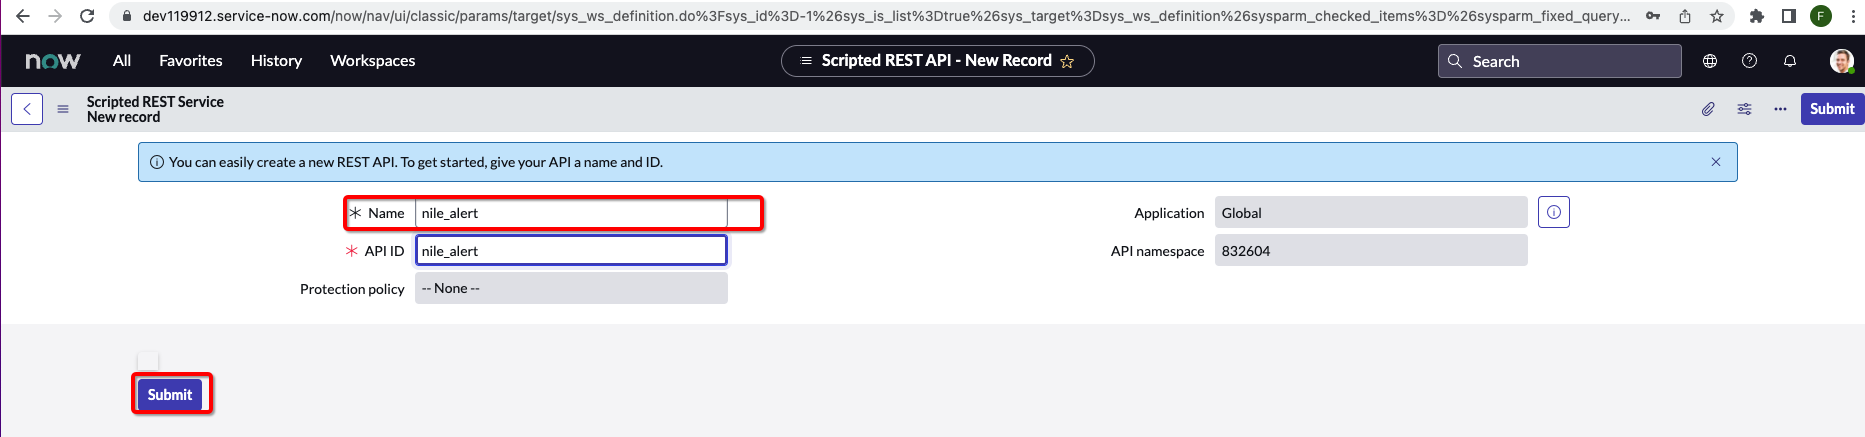
- In the Name field, provide an API name. In our example, we used “nile_alert”.
Click on Submit.
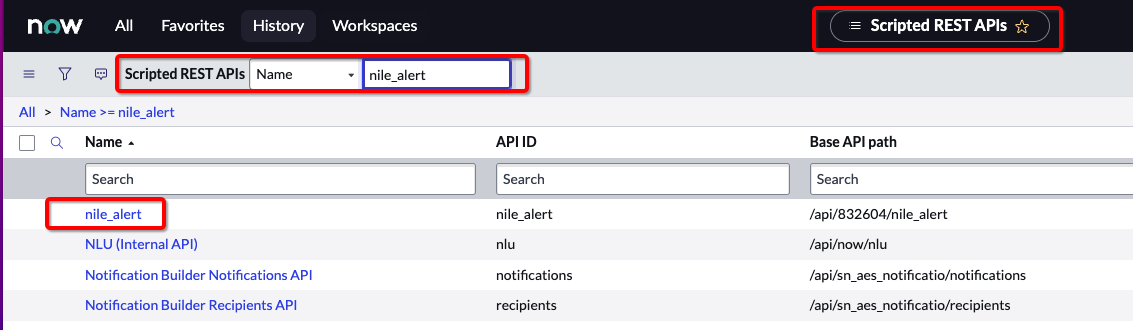
- Search REST APIs name “nile_alert” and double click on the link to open the API URL
- To add the API script, under the Resources tab click New.
- Select HTTP Method as POST.
In the Script section, copy and paste the Nile script.
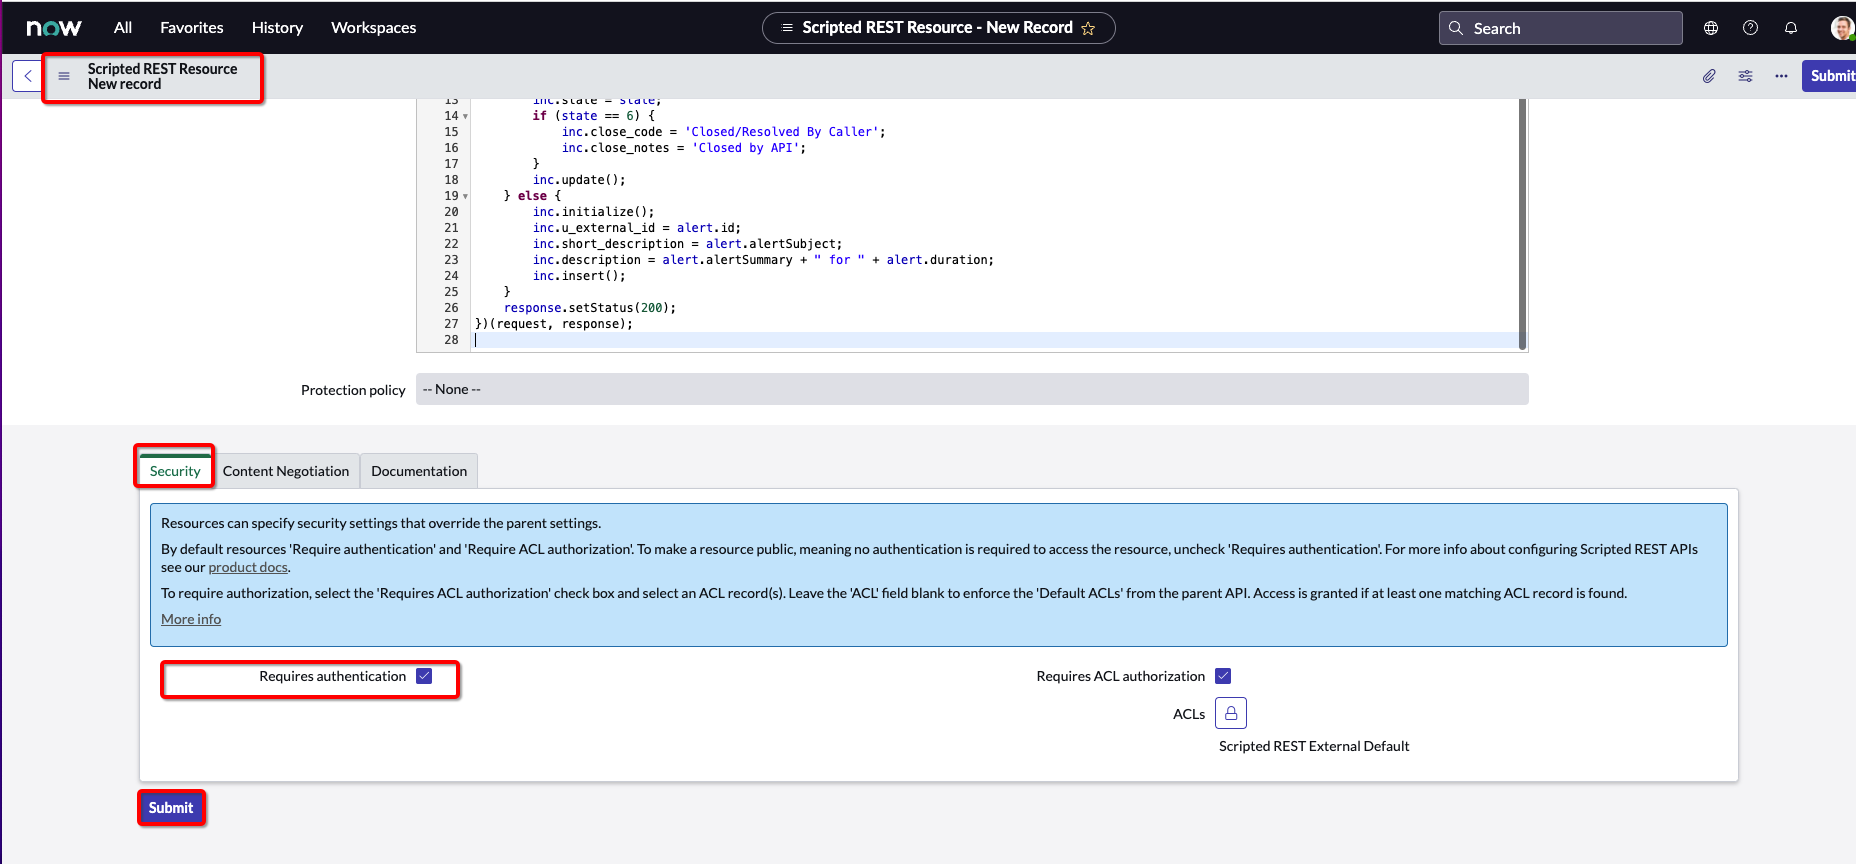
- Under the Security tab, make sure the Requires Authentication checkbox is enabled.
Click on Submit.
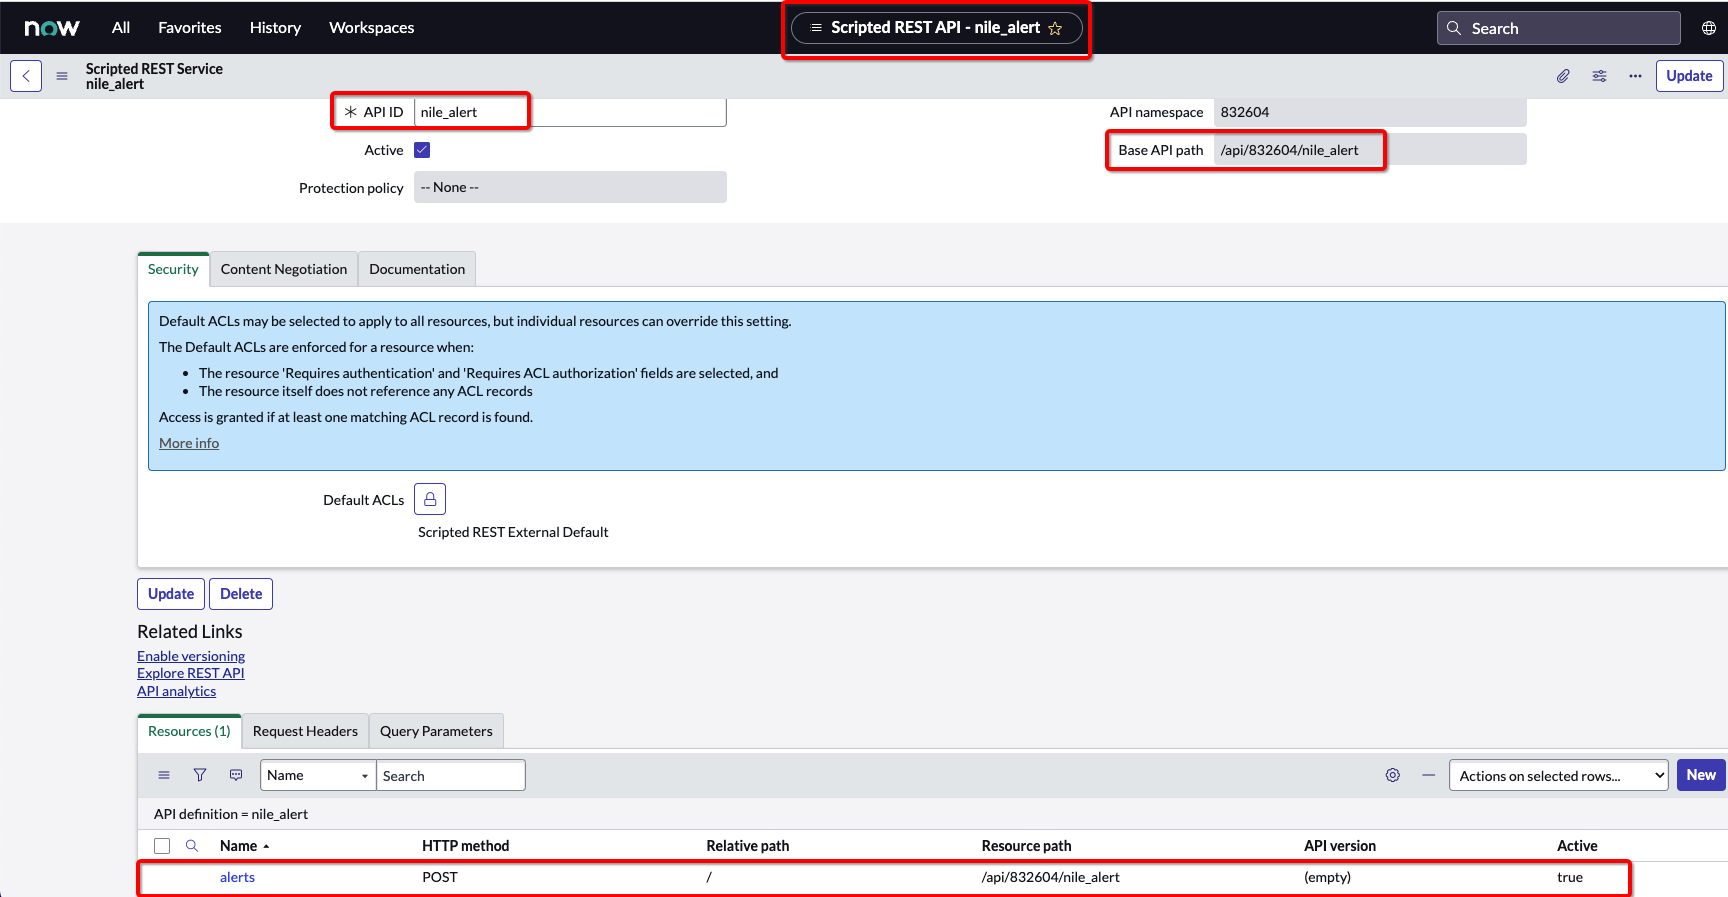
- Take a note of the resource path URL; it’s needed for integration and API testing.
In our example API resource URL is “/api/832604/nile_alert” , this completed the ServiceNow setup
Testing ServiceNow API using Postman
- We will need a fully qualified REST API path. For ServiceNow, the fully qualified path is https:// + + In our example, it will be https://dev119912.service-now.com/api/832604/nile_alert.
You will need the URL for API postman verification and Nile integration. - Open Postman
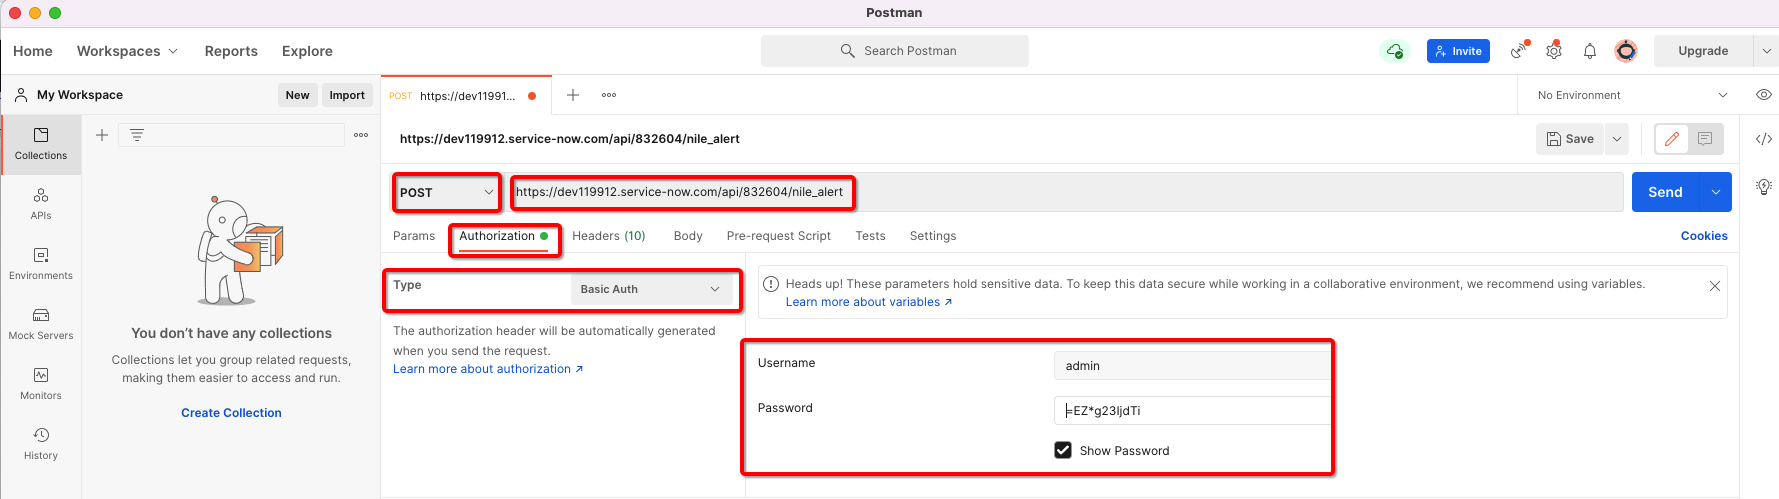
Select POST, and provide the API URL.
Click on Authorization , select Type Basic Auth, and provide ServiceNow instance admin credentials (In this example, the username and password was defined as “admin/=EZ*g23IjdTi”)
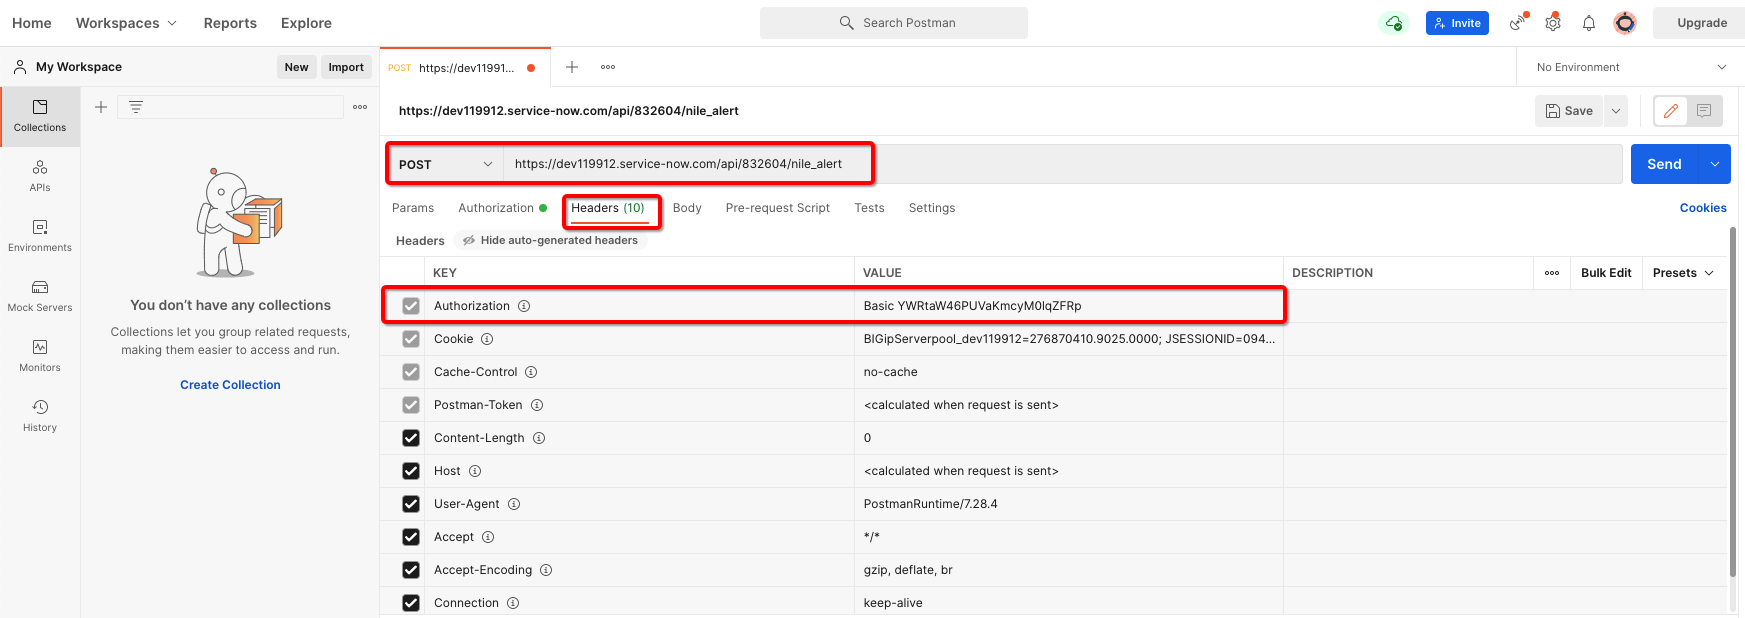
- Nile portal required a basic token for integration. Postman will generate a basic token from authentication, and you will need the key (token) to set up Nile webhook ServiceNow Integration. To view and copy the basic token, click on Headers, it will show you all headers including Authorization , copy Authorization header key values including “Basic” keyword.
The authorization token shown in the example illustration is ”Basic YWRtaW46PUVaKmcyM0lqZFRp”.
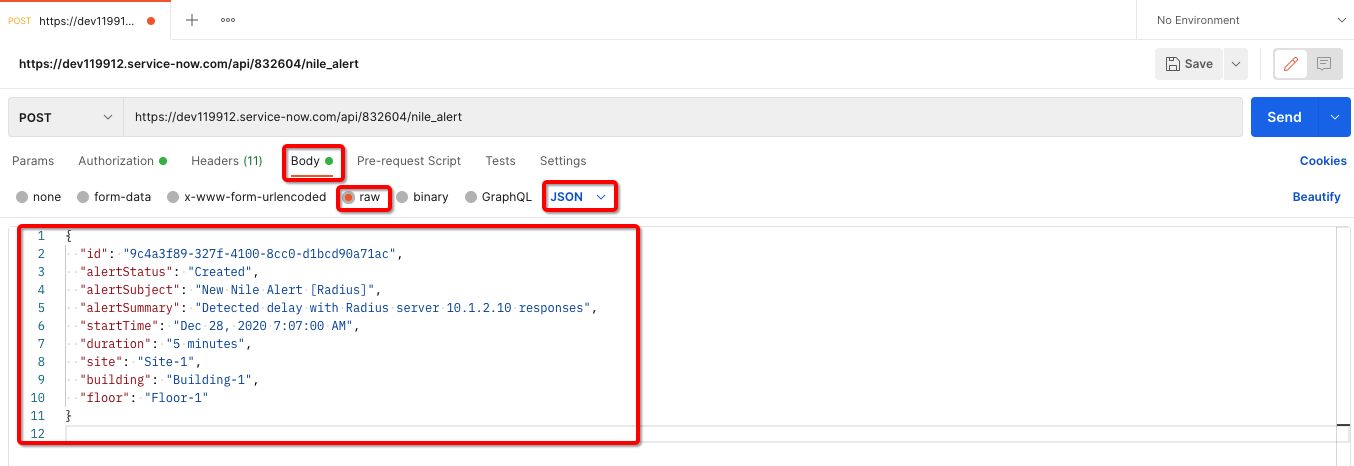
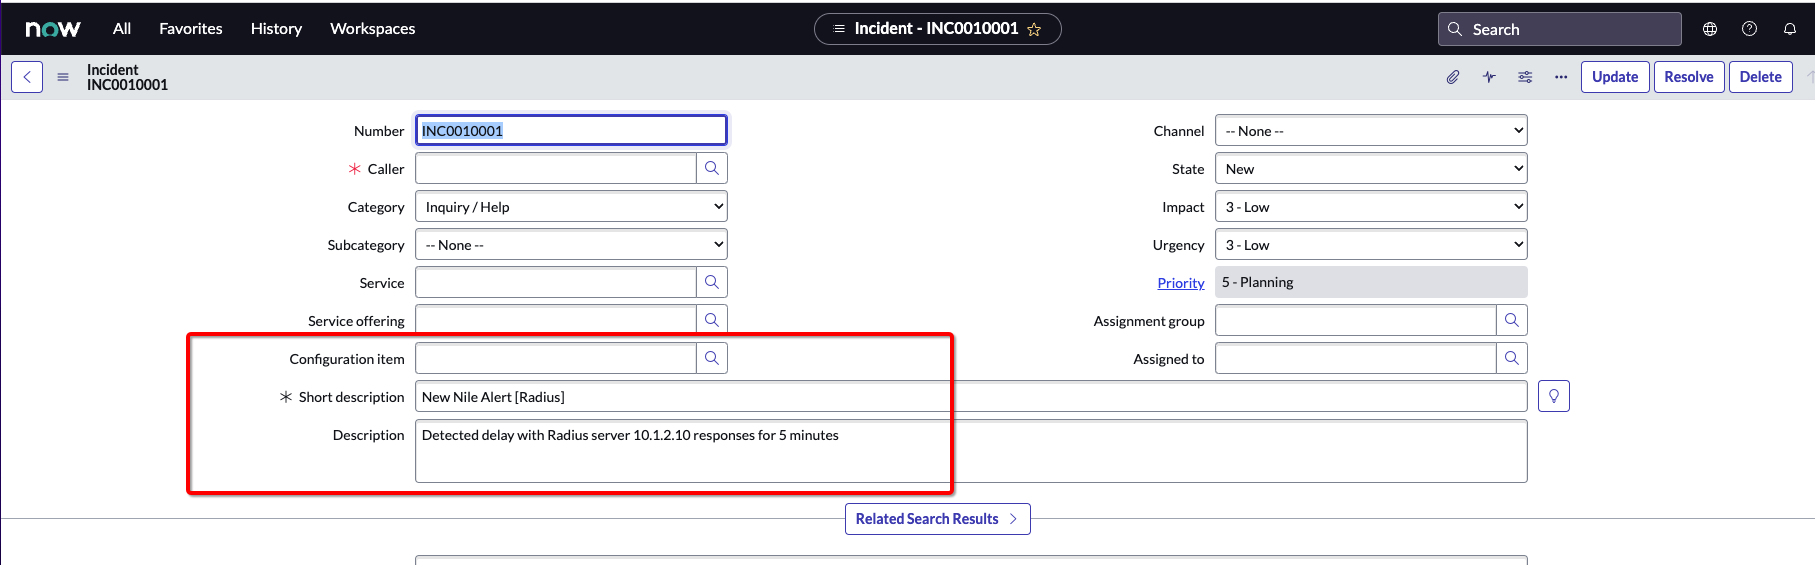
- To test the API, we will need to generate a test incident, we can use a simple JSON alert payload that simulates “Alert Notifier” / “Notification Services”, below is a simple schema to generate a simple alert. All the fields in the JSON are String type.
{
"id": "9c4a3f89-327f-4100-8cc0-d1bcd90a71ac",
"alertStatus": "Created",
"alertSubject": "New Nile Alert [Radius]",
"alertSummary": "Detected delay with Radius server 10.1.2.10 responses",
"startTime": "Dec 28, 2020 7:07:00 AM",
"duration": "5 minutes",
"site": "Site-1",
"building": "Building-1",
"floor": "Floor-1"
}
- To generate the test alert, select the Body option, click on raw , change format to JSON, and copy and paste the incident JSON example as below:
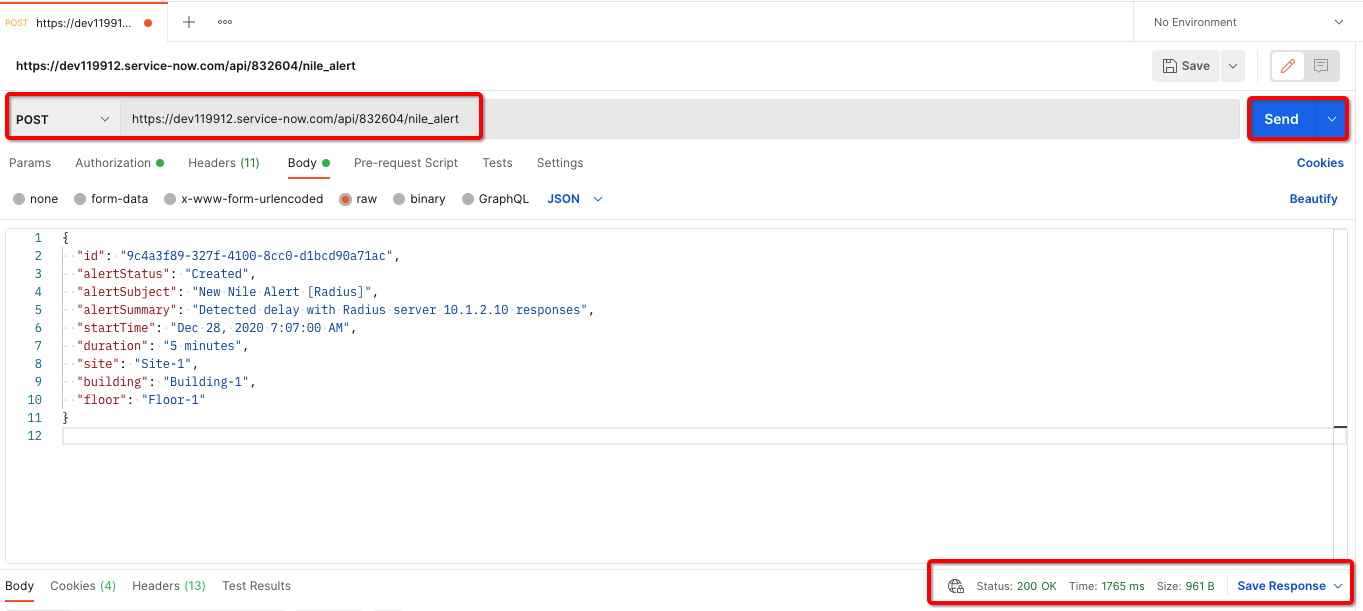
- Click on Send and verify the status, the status should be 200 OK, this means the REST API request was completed without any error.
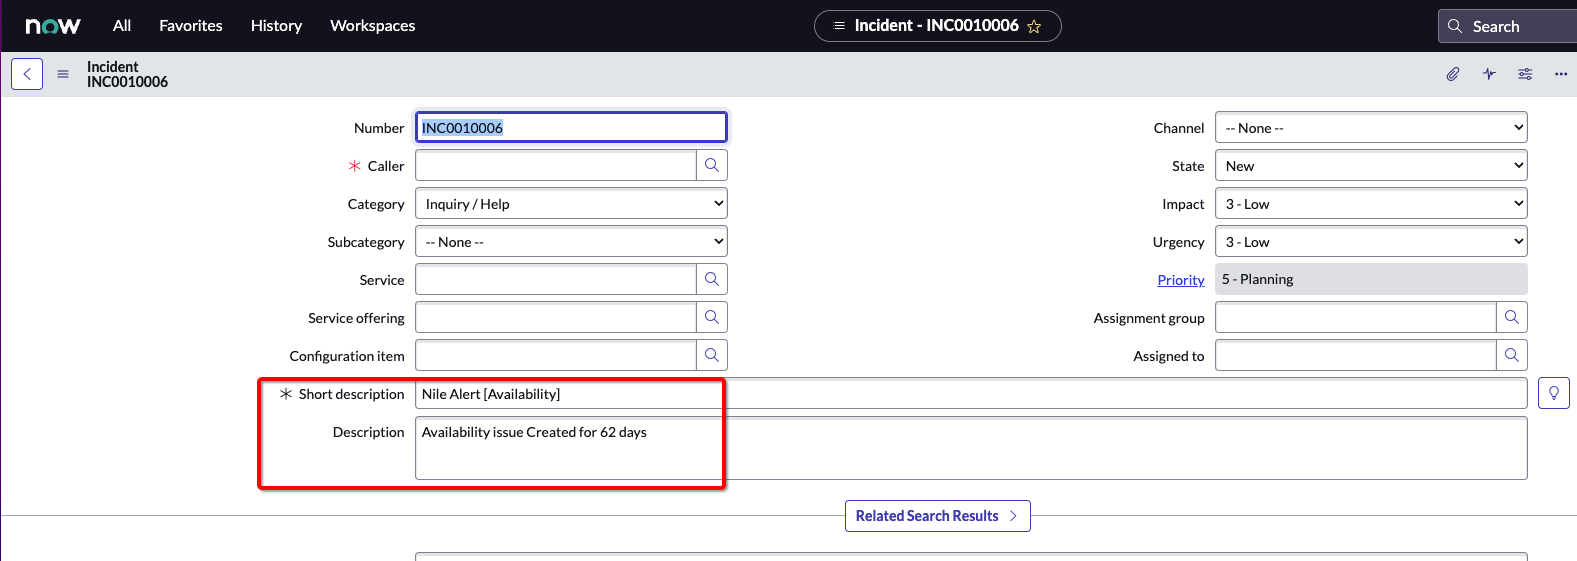
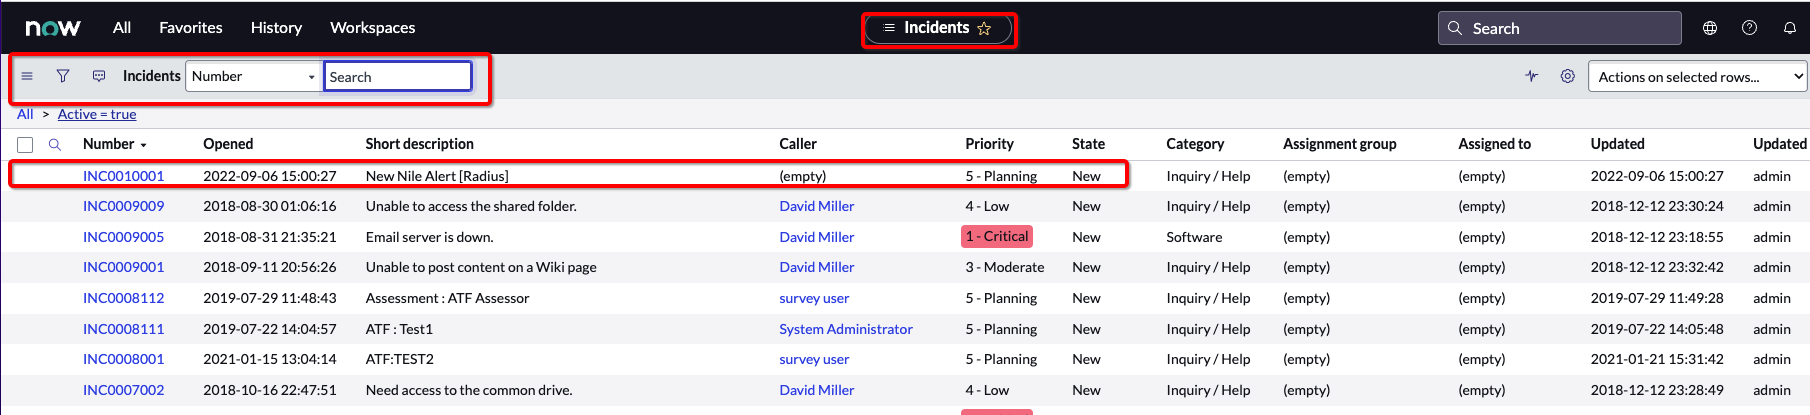
- Verify the incident is created under ServiceNow, from the ServiceNow instance, under All, filter on Service Desk, then click on Incidents, Incident table will be opened, first Incident will be the test incident that we generate using Postman

Add ServiceNow Webhooks to Nile Portal
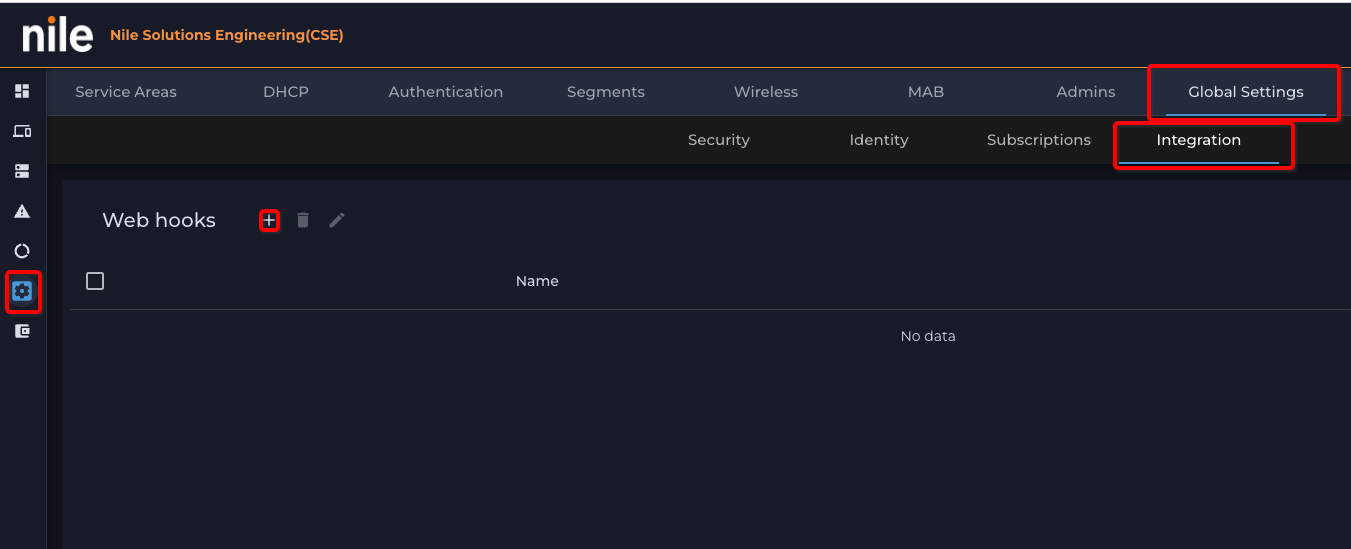
- Login to Nile portal using an admin account, and navigate to Settings
Select Global Settings
Select Integration; click on “+” sign to add ServiceNow webhooks.
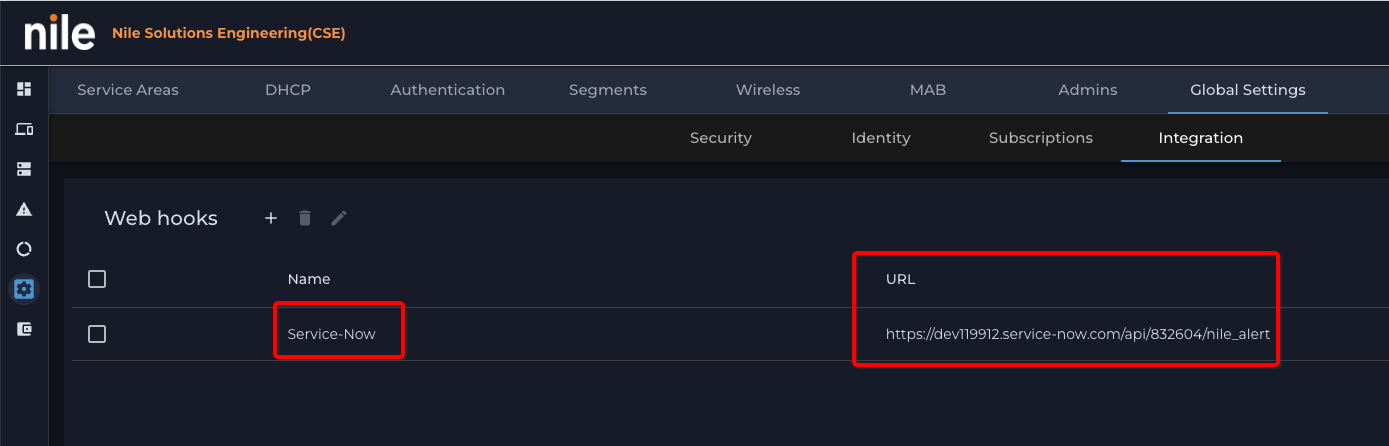
- Fill out ServiceNow Webhooks info:
Name: Webhooks name example “Service-Now”
URL : ServiceNow API URL “https://instance name + resource path”.
In our example, it will be
https://dev119912.service-now.com/api/832604/nile_alert
Token: Basic Authentication token generated by Postman
In our example
“Basic YWRtaW46PUVaKmcyM0lqZFRp”
Click on SAVE to save the setup.

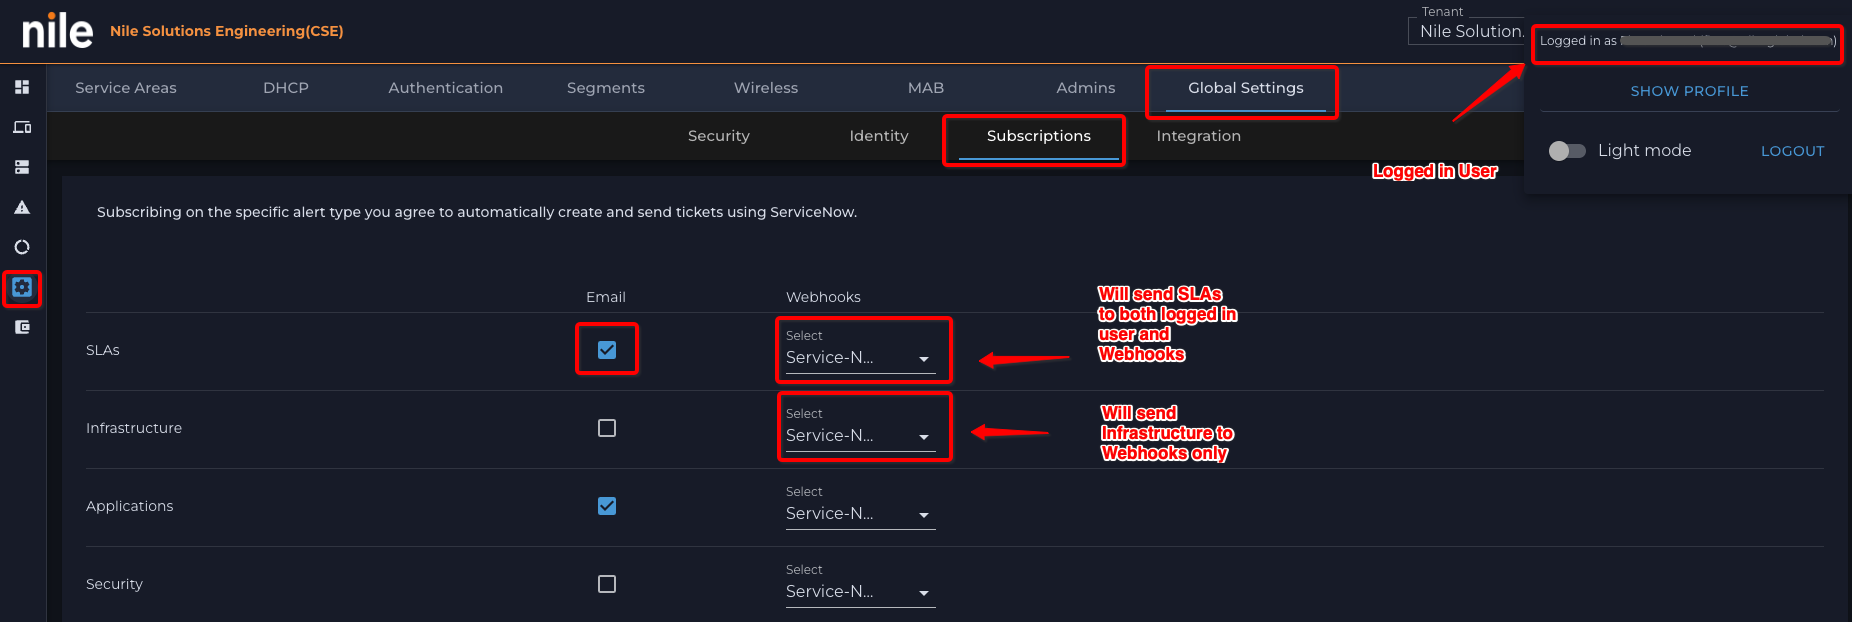
Enable Webhooks alert subscription
- Nile portal has options to send specific alert to admin via email or to Webhooks. These alert groups are:
|
SLAs |
Nile service availability, coverage, and capacity alerts |
|
Infrastructure |
Infrastructure DHCP, DNS, RADIUS, and Internet availability alerts |
|
Applications |
Application availability and latency alerts |
|
Security |
Wireless Intrusion Detection (WIDS) alerts |
- Login to Nile portal using an admin account and navigate to Settings.
Select Global Settings.
Select Subscriptions.
Selecting Email will enable alerts to be sent to a logged-in admin.
Selecting Webhooks will send alerts via Webhook (in our example Service-Now). Note: the selected options are saved automatically
Verify Nile Events under ServiceNow and Report:
- Login to Nile Portal as an admin.
- Click on Alert icon (triangle on left side)
Click on Alerts tab
Verify Nile alerts
Browse to Nile Alert & Audit
Under Alerts list, verify Nile CRETAD alerts

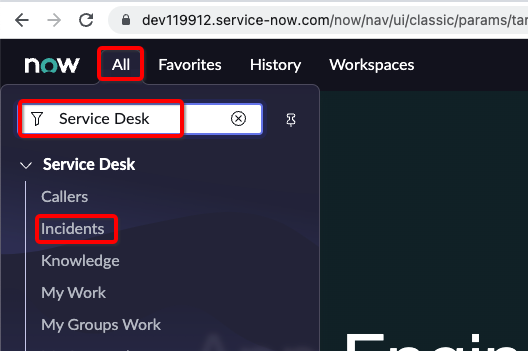
- Login to ServiceNow instance as an admin.
- Verify Nile alerts are created as incidents under ServiceNow: from the ServiceNow instance, under All, filter on Service Desk, then click on Incidents, Incident table will be opened.
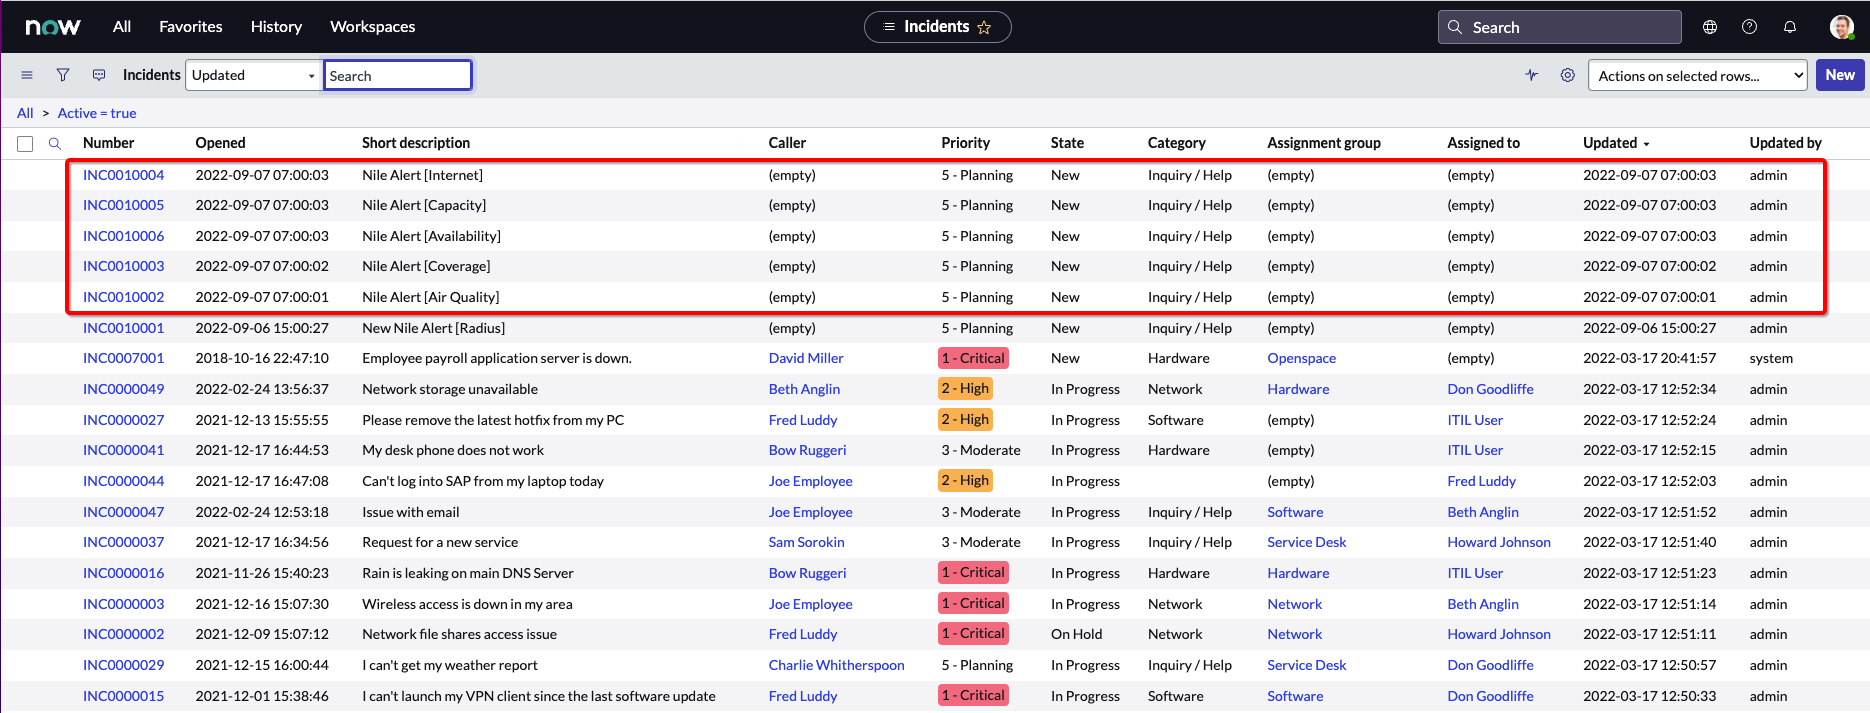
- Click on the blue link of the incident number to see the detail: